Обнаружение человека с помощью
TensorFlow и Arduino
Используя библиотеку TensorFlow Lite, мы можем прошивать крошечные модели машинного обучения на Arduino, чтобы обнаруживать людей с камеры.
Одним из захватывающих аспектов запуска моделей машинного обучения на встроенном оборудовании является возможность использовать устройства с низким энергопотреблением с большей контекстной осведомленностью для запуска устройств с высоким энергопотреблением только тогда, когда это необходимо.
Чтобы узнать больше об этом видении, посетите блог Пита Уордена .
В качестве доказательства концепции мы хотим использовать маломощный Arduino Nano 33 BLE Sense и ArduCam Mini 2MP вместе с библиотекой TensorFlow Lite, чтобы запускать реле для включения / выключения при распознавании человека.
Базовая проводка
Следуйте следующей схеме подключения, чтобы подключить Arduino Nano 33 BLE Sense к ArduCam Mini 2MP. На этой схеме также показано, как добавить липо-аккумулятор после прошивки Arduino.
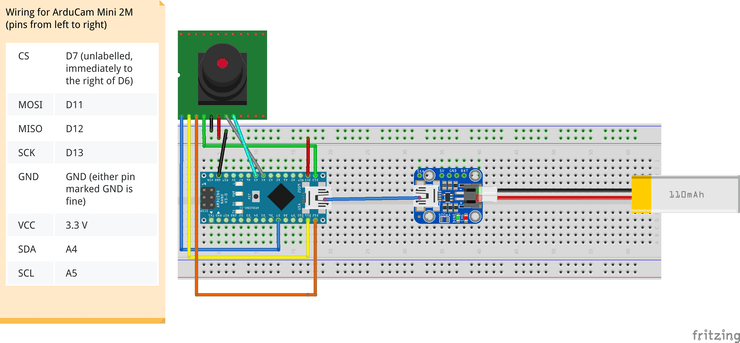
контакты на камере в порядке слева направо
Прошивка модели
В официальном репозитории TensorFlow было выпущено несколько примеров крошечных моделей, наиболее широко показываемым примером является модель micro_speech. Мы хотели прошить демонстрацию видения (person_detection), однако на момент написания этого поста не все ресурсы были доступны. Из примера micro_speech мы увидели, что эти zip-пакеты Arduino хранились в том же месте, что и сборки TensorFlow Google . Перейдя по этой ссылке, вы увидите дерево документов со ссылками на все виды ночных сборок:
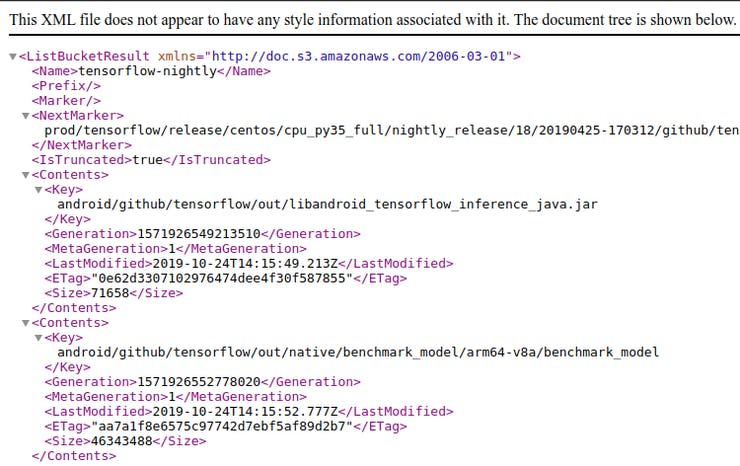
дерево документов со ссылками
Выполнив быстрый поиск слов в дереве документов, мы смогли найти недостающий пакет! (Обновление: команда TF работает над обновлением недостающего звена)

person_detection найдено! Zip-пакет под немного другим именем
Скачайте ссылку на этот пакет и переименуйте его в person_detection.zip. Это будет пакет, который мы загрузим в виде библиотеки в нашу среду разработки Arduino, как описано в официальных инструкциях .
После загрузки этого zip-пакета мы хотим внести еще пару изменений, чтобы все работало гладко. В любом текстовом редакторе найдите, где установлена библиотека Arduino, и откройте файл library.properties для редактирования.
# In our case, our Arduino library is in ~/Arduino/libraries
$ cd ~/Arduino/libraries/person_detection
$ vim library.properties
Измените первую строку, в которой объявляется имя библиотеки, на TensorFlowLite: person_detection. Ваш файл должен выглядеть так:
name=TensorFlowLite:person_detection
version=1.14-ALPHA
author=TensorFlow Authors
maintainer=Pete Warden <petewarden@google.com>
sentence=Allows you to run machine learning models locally on your device.
paragraph=This library runs TensorFlow machine learning models on microcontrollers, allowing you to build AI/ML applications powered by deep learning and neural networks. With the included examples, you can recognize speech, detect people using a camera, and recognise "magic wand" gestures using an accelerometer. The examples work best with the Arduino Nano 33 BLE Sense board, which has a microphone and accelerometer.
category=Data Processing
url=https://www.tensorflow.org/lite/microcontrollers/overview
ldflags=-lm
includes=TensorFlowLite.h
Это делает его видимым в меню примеров Arduino IDE. Наконец, перейдите в каталог examples / в том же месте и переименуйте подкаталог в person_detection. Все эти изменения устраняют необходимые различия для запуска демонстрации.
Отсюда вы можете следовать официальным инструкциям по загрузке библиотек для декодирования ArduCam и JPEG.
Чтобы запустить пример, перейдите в Файлы -> Примеры -> TensorflowLite: person_detection и выберите образец скрипта person_detection. Убедитесь, что ваш Arduino BLE 33 sense подключен к компьютеру и выбран для прошивки в среде Arduino IDE. Прошить пример, и он должен немедленно запуститься. Встроенный светодиодный индикатор будет мигать синим, указывая на то, что изображение было снято и логический вывод завершен. Свет станет красным, если он не обнаружил человека, и станет зеленым, когда обнаружил. Вывод занимает ~ 19 секунд, так как модель обнаружения человека довольно велика для устройства.
Использование Arduino в качестве умного переключателя
Микроконтроллеры очень энергоэффективны, некоторые из них могут работать от батарейки типа «таблетка» годами! Благодаря недавним усилиям по минимизации моделей машинного обучения для работы на встроенных устройствах, мы можем создать интеллектуальные «переключатели», которые можно задействовать для включения или запуска других устройств, которым для работы требуется больше энергии. С этой моделью обнаружения человека, работающей на Arduino BLE sense, мы можем запустить устройство с высоким энергопотреблением, такое как осел, используя щит сомбреро. Мы будем использовать реле, подключенное к Arduino, и включать / выключать его в зависимости от результатов логического вывода.
Подключите реле, пи и ардуино, следуя схеме подключения ниже:
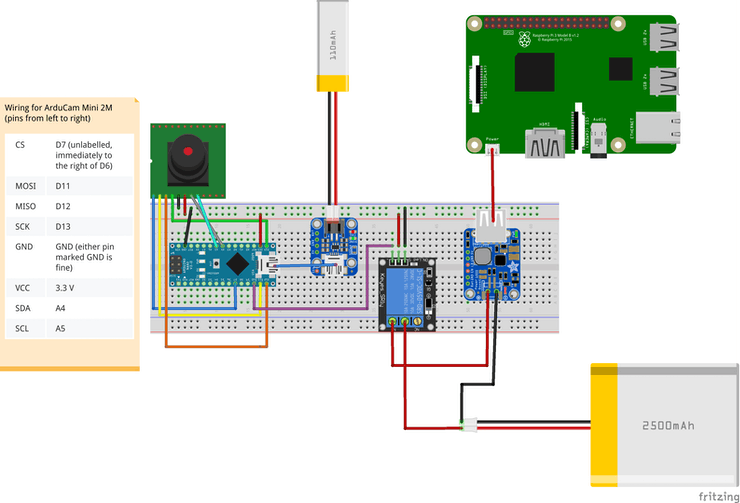
когда человек обнаружен, активируйте raspberry pi ON
Теперь просто добавьте несколько строк в пример person_detection.ino, чтобы просмотреть результаты вывода и переключить реле.
// at the top of the script, initialize a variable for the relay signal
int relayOut = 10;
// in the setup() loop, initialize the relayOut pin as output
void setup(){
/* .... */
pinMode(relayOut, OUTPUT);
}
// in the void() loop:
void loop() {
// Get image from provider.
if (kTfLiteOk != GetImage(error_reporter, kNumCols, kNumRows, kNumChannels,
input->data.uint8)) {
error_reporter->Report("Image capture failed.");
}
// Run the model on this input and make sure it succeeds.
if (kTfLiteOk != interpreter->Invoke()) {
error_reporter->Report("Invoke failed.");
}
TfLiteTensor* output = interpreter->output(0);
// Process the inference results.
uint8_t person_score = output->data.uint8[kPersonIndex];
uint8_t no_person_score = output->data.uint8[kNotAPersonIndex];
RespondToDetection(error_reporter, person_score, no_person_score);
// Add the following lines:
if (person_score >= no_person_score){
digitalWrite(relayOut, HIGH);
}
else {
digitalWrite(relayOut, LOW);
}
}
Расширение нашего Smart Switch с помощью BLE
Могут возникнуть ситуации, когда устройство с высокой мощностью может выиграть от логики, выведенной где-то в другом месте. Например, предположим, что вы хотите, чтобы энергоемкий вездеход запускался при обнаружении человека в другой части большого склада. Способ расширения восприятия нашего интеллектуального релейного переключателя - это BLE.
BLE - это протокол беспроводной связи с низким энергопотреблением, предназначенный для отправки небольших объемов данных. В этом примере мы настроили Arduino Nano 33 BLE Sense с подключенной к нему ArduCam в качестве элемента управления, отправляя высокий уровень оповещения при обнаружении человека. В скрипте person_detection, наряду с другими шагами инициализации BLE, мы добавляем логику для отправки высокого предупреждения, когда person_score достаточно велик.
if (peripheral.connected()) {
if (sendsignal > 0){
alertLevelChar.writeValue((byte)0x02);
Serial.println("Wrote high alert");
}
else{
alertLevelChar.writeValue((byte)0x00);
Serial.println("Wrote low alert");
}
}
Второй Arduino Nano 33 BLE Sense будет служить периферийным устройством, которое будет прослушивать это предупреждение и переключать подключенное к нему реле.
while (central.connected()) {
//Serial.println("Getting Alert Level:");
if (alertLevelChar.written()){
if (alertLevelChar.value()){
digitalWrite(relay, HIGH);
Serial.println("Set relay to HIGH");
} else {
digitalWrite(relay, LOW);
Serial.println("Set relay to LOW");
}
}
}
Код
/* Copyright 2019 The TensorFlow Authors. All Rights Reserved.
Licensed under the Apache License, Version 2.0 (the "License");
you may not use this file except in compliance with the License.
You may obtain a copy of the License at
http://www.apache.org/licenses/LICENSE-2.0
Unless required by applicable law or agreed to in writing, software
distributed under the License is distributed on an "AS IS" BASIS,
WITHOUT WARRANTIES OR CONDITIONS OF ANY KIND, either express or implied.
See the License for the specific language governing permissions and
limitations under the License.
==============================================================================*/
#include <ArduinoBLE.h>
#include <TensorFlowLite.h>
#include "main_functions.h"
#include "detection_responder.h"
#include "image_provider.h"
#include "model_settings.h"
#include "person_detect_model_data.h"
#include "tensorflow/lite/experimental/micro/kernels/micro_ops.h"
#include "tensorflow/lite/experimental/micro/micro_error_reporter.h"
#include "tensorflow/lite/experimental/micro/micro_interpreter.h"
#include "tensorflow/lite/experimental/micro/micro_mutable_op_resolver.h"
#include "tensorflow/lite/schema/schema_generated.h"
#include "tensorflow/lite/version.h"
// Globals, used for compatibility with Arduino-style sketches.
namespace {
tflite::ErrorReporter* error_reporter = nullptr;
const tflite::Model* model = nullptr;
tflite::MicroInterpreter* interpreter = nullptr;
TfLiteTensor* input = nullptr;
// An area of memory to use for input, output, and intermediate arrays.
constexpr int kTensorArenaSize = 70 * 1024;
static uint8_t tensor_arena[kTensorArenaSize];
} // namespace
// The name of this function is important for Arduino compatibility.
void setup() {
// Set up logging. Google style is to avoid globals or statics because of
// lifetime uncertainty, but since this has a trivial destructor it's okay.
// NOLINTNEXTLINE(runtime-global-variables)
static tflite::MicroErrorReporter micro_error_reporter;
error_reporter = µ_error_reporter;
// Map the model into a usable data structure. This doesn't involve any
// copying or parsing, it's a very lightweight operation.
model = tflite::GetModel(g_person_detect_model_data);
if (model->version() != TFLITE_SCHEMA_VERSION) {
error_reporter->Report(
"Model provided is schema version %d not equal "
"to supported version %d.",
model->version(), TFLITE_SCHEMA_VERSION);
return;
}
// Pull in only the operation implementations we need.
// This relies on a complete list of all the ops needed by this graph.
// An easier approach is to just use the AllOpsResolver, but this will
// incur some penalty in code space for op implementations that are not
// needed by this graph.
//
// tflite::ops::micro::AllOpsResolver resolver;
// NOLINTNEXTLINE(runtime-global-variables)
static tflite::MicroMutableOpResolver micro_mutable_op_resolver;
micro_mutable_op_resolver.AddBuiltin(
tflite::BuiltinOperator_DEPTHWISE_CONV_2D,
tflite::ops::micro::Register_DEPTHWISE_CONV_2D());
micro_mutable_op_resolver.AddBuiltin(tflite::BuiltinOperator_CONV_2D,
tflite::ops::micro::Register_CONV_2D());
micro_mutable_op_resolver.AddBuiltin(
tflite::BuiltinOperator_AVERAGE_POOL_2D,
tflite::ops::micro::Register_AVERAGE_POOL_2D());
// Build an interpreter to run the model with.
static tflite::MicroInterpreter static_interpreter(
model, micro_mutable_op_resolver, tensor_arena, kTensorArenaSize,
error_reporter);
interpreter = &static_interpreter;
// Allocate memory from the tensor_arena for the model's tensors.
TfLiteStatus allocate_status = interpreter->AllocateTensors();
if (allocate_status != kTfLiteOk) {
error_reporter->Report("AllocateTensors() failed");
return;
}
// Get information about the memory area to use for the model's input.
input = interpreter->input(0);
/* BLE initialize */
BLE.begin();
//BLE.scanForUuid("1801");
}
// The name of this function is important for Arduino compatibility.
void loop() {
// Get image from provider.
if (kTfLiteOk != GetImage(error_reporter, kNumCols, kNumRows, kNumChannels,
input->data.uint8)) {
error_reporter->Report("Image capture failed.");
}
// Run the model on this input and make sure it succeeds.
if (kTfLiteOk != interpreter->Invoke()) {
error_reporter->Report("Invoke failed.");
}
TfLiteTensor* output = interpreter->output(0);
// Process the inference results.
uint8_t person_score = output->data.uint8[kPersonIndex];
uint8_t no_person_score = output->data.uint8[kNotAPersonIndex];
RespondToDetection(error_reporter, person_score, no_person_score);
/* Send inference via bluetooth */
BLE.scanForUuid("1801");
delay(500); // delay to find uuid
BLEDevice peripheral = BLE.available();
Serial.println(peripheral);
if (peripheral){
if (peripheral.localName() != "PersonDetectionMonitor") {
return;
}
BLE.stopScan();
if (person_score > no_person_score){
sendAlert(peripheral,2);
}
else{
sendAlert(peripheral,0);
}
//peripheral.disconnect();
}
else{
Serial.println("Peripheral not available");
}
}
void sendAlert(BLEDevice peripheral, int sendsignal) {
// connect to the peripheral
Serial.println("Connecting ...");
if (peripheral.connect()) {
Serial.println("Connected");
} else {
Serial.println("Failed to connect!");
return;
}
// discover peripheral attributes
Serial.println("Discovering attributes ...");
if (peripheral.discoverAttributes()) {
Serial.println("Attributes discovered");
} else {
Serial.println("Attribute discovery failed!");
peripheral.disconnect();
return;
}
// retrieve the alert level characteristic
BLECharacteristic alertLevelChar = peripheral.characteristic("2A06");
if (!alertLevelChar) {
Serial.println("Peripheral does not have alert level characteristic!");
peripheral.disconnect();
return;
} else if (!alertLevelChar.canWrite()) {
Serial.println("Peripheral does not have a writable alert level characteristic!");
peripheral.disconnect();
return;
}
if (peripheral.connected()) {
if (sendsignal > 0){
alertLevelChar.writeValue((byte)0x02);
Serial.println("Wrote high alert");
}
else{
alertLevelChar.writeValue((byte)0x00);
Serial.println("Wrote low alert");
}
}
peripheral.disconnect();
Serial.println("Peripheral disconnected");
}
Периферийное устройство
#include <ArduinoBLE.h>
#include "Arduino.h"
// Relay on D8
int relay = 8;
// BLE PersonDetection Service
BLEService PersonDetectionService("1801");
// BLE Alert Level Characteristic
BLEByteCharacteristic alertLevelChar("2A06", // standard 16-bit characteristic UUID
BLERead | BLEWrite); // remote clients will be able to get notifications if this characteristic changes
void setup() {
Serial.begin(9600); // initialize serial communication
while (!Serial);
pinMode(LED_BUILTIN, OUTPUT); // initialize the built-in LED pin to indicate when a central is connected
//pinMode(LEDR, OUTPUT);
//pinMode(LEDG, OUTPUT);
//pinMode(LEDB, OUTPUT);
//pinMode(relay, OUTPUT);
//digitalWrite(LEDR, LOW);
//digitalWrite(LEDG, LOW);
//digitalWrite(LEDB, LOW);
digitalWrite(relay, LOW);
// begin initialization
if (!BLE.begin()) {
Serial.println("starting BLE failed!");
while (1);
}
/* Set a local name for the BLE device
This name will appear in advertising packets
and can be used by remote devices to identify this BLE device
The name can be changed but maybe be truncated based on space left in advertisement packet
*/
BLE.setLocalName("PersonDetectionMonitor");
BLE.setAdvertisedService(PersonDetectionService); // add the service UUID
PersonDetectionService.addCharacteristic(alertLevelChar); // add the alert level characteristic
BLE.addService(PersonDetectionService); // Add the battery service
alertLevelChar.writeValue((byte)0x00);
/* Start advertising BLE. It will start continuously transmitting BLE
advertising packets and will be visible to remote BLE central devices
until it receives a new connection */
// start advertising
BLE.advertise();
Serial.println("Bluetooth device active, waiting for connections...");
}
void loop() {
// wait for a BLE central
BLEDevice central = BLE.central();
// if a central is connected to the peripheral:
if (central) {
Serial.print("Connected to central: ");
// print the central's BT address:
Serial.println(central.address());
// turn on the LED to indicate the connection:
digitalWrite(LED_BUILTIN, HIGH);
// while the central is connected:
while (central.connected()) {
//Serial.println("Getting Alert Level:");
if (alertLevelChar.written()){
if (alertLevelChar.value()){
Serial.println("Got high alert");
digitalWrite(relay, HIGH);
Serial.println("Set relay to HIGH");
} else{
Serial.println("Got low alert");
digitalWrite(relay, LOW);
Serial.println("Set relay to LOW");
}
}
}
// when the central disconnects, turn off the LED:
digitalWrite(LED_BUILTIN, LOW);
Serial.print("Disconnected from central: ");
Serial.println(central.address());
}
}